Instructions here includes editing & customizing mobile navigation links, insert image slider, click to action buttons, subscribe buttons via Google feed burner, safely remove non-required shopping cart functions, adding social icons, adding pre-installed on-line payment logos, remove the tax options, remove shipping/delivery options and more.
Main Navigation Drop Down Editing
Find below codes to edit the main navigation drop down links. An example format is given in template codes. First 2 links not required as it has already been preset to display your gallery page.
To edit a drop down link section edit at below areas:-

Sticky Social Icons
Edit the URL to your social profile page for the social icons located at the sticky header section.

Customize View Cart Drop Down Link
In template editor find codes below:-<!-- CHECKOUT BUTTONS -->
Slightly below, you will find these codes:-
<a class='send-order button' href='/p/send-order.html'>Send Order</a>
Homepage Responsive Image Slider Editing
Insert your desired slider images at the given codes below. Upload an image with ideal size of 1200pixels width & 960pixels in width at 4:3 image ratio. Each image file size must be below 150 kilobytes.
Include your uploaded image URL at below highlighted codes:-

Edit the click to action button for the image slider at below codes. An example code for the buttons is located below the screenshot.
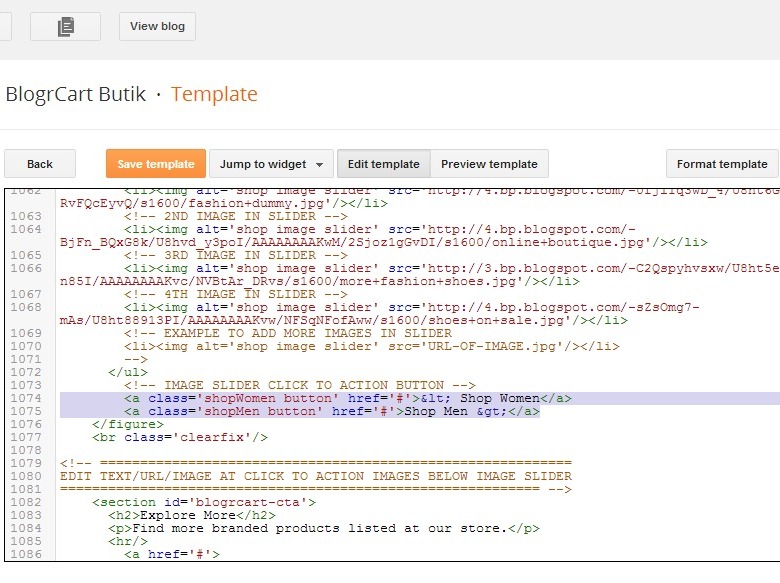
Example image click to action button ( URL's & text) as follows:-
<a class='shopWomen' href='INSERT-URL-HERE'>EDIT-TEXT-TO-DISPLAY-HERE</a>

<a class='shopMen' href='INSERT-URL-HERE'>EDIT-TEXT-TO-DISPLAY-HERE</a>
Homepage Click To Action Image Info
Edit the Headings & paragraphs for the Click to Action sections at Homepage (below responsive image slider). Screen shot below would be your reference. Each click to action section is contained by an <figure>...</figure> tag.
Edit the Click to Action heading title and paragraphs at below codes:-
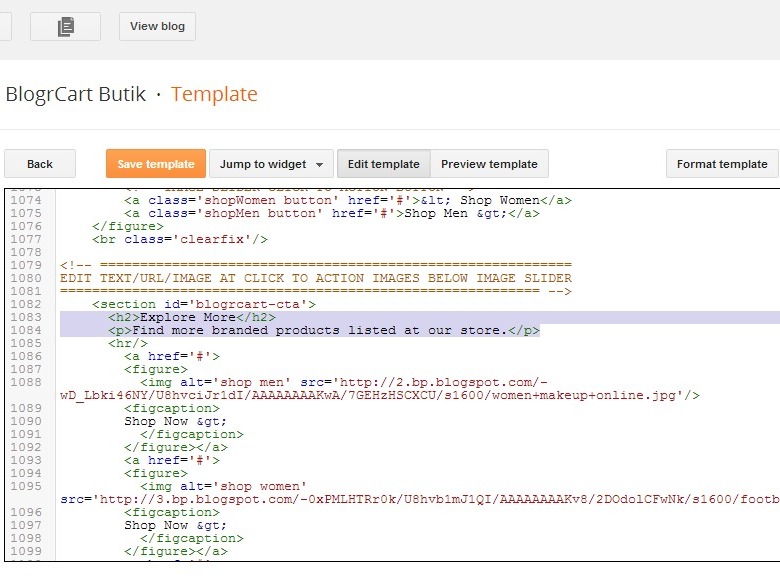
Insert your click to action uploaded image at below codes. Preferred image ia 900pixels in width and 600pixels in height at 4:3 image ratio. Each image file size must be below 150kb.

Edit the click to action URL at below codes.
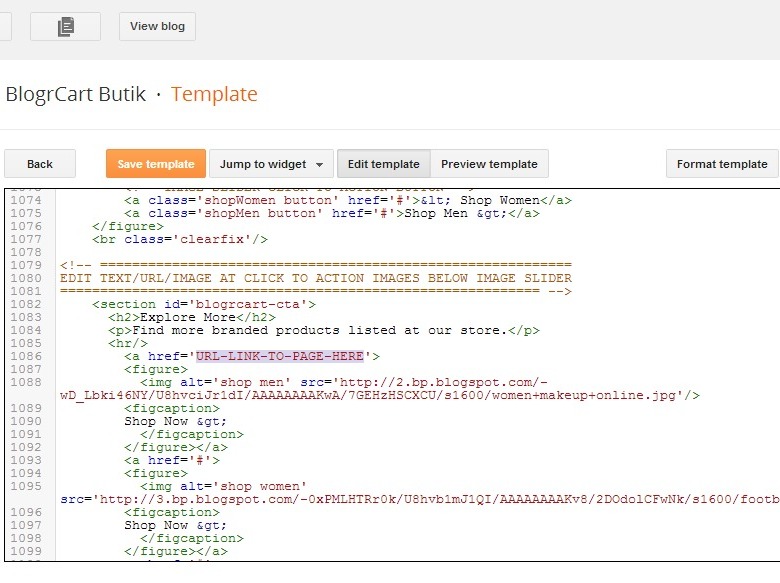
Here is an example of the click to action format to include the URL link.
<a href='YOUR-PAGE-LINK-TO-URL'>Shop Now</a>
Homepage Info Section Text
Edit the Headings & paragraphs for the Homepage Info section texts at below codes:-
Each Homepage Info section starts at <article> and ends with </article>
Edit the Info Section headings per <article> here:-
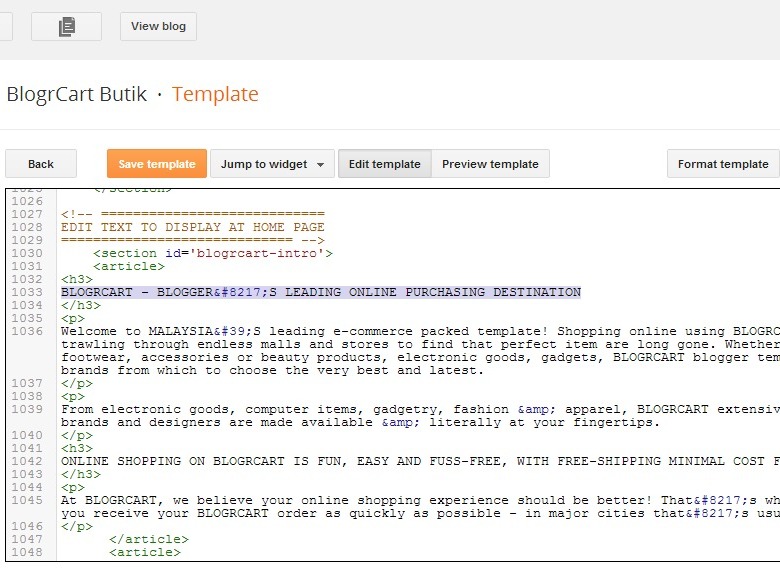
Edit the Info Section paragraphs per <article> here:-

Install Default Blogger Comment System
To install the default Blogger comment system head over to Blog1 widget > expand <b:includable id='main'> and find below codes:-
Uncomment the BEGINNING & END at the codes shown above.
Payment Icon at Product Post Page
To customize the display of the payment icons located at product post, head over to Blog1 widget > expand <b:includable id='post'> and find below codes:-
Remove the commented out codes to display the payment icons required. An example mark up code to display the icons should be similar with the first 2 lines of codes above.
Edit Social Share Buttons on Product Page
PRO template comes with social sharing icons pre-built & optimised to easily/instantly share products listed in the Blogger store.In Blog1 widget > expand <b:includable id='social-share' var='posts'> by clicking the black triangle > view the social sharing codes.
At below codes edit your Twitter account username and data related to auto Tweet:-
<div class='icons twitter'><a class='twitter-share-button' data-related='TEXT-TO-DISPLAY-IN-TWEETS' data-via='TWITTER-USERNAME' href='https://twitter.com/share'>Tweet</a></div>
Related Product Display at Product Post
PRO template comes with related products pre-installed in the product posts.In Blog1 widget > expand <b:includable id='related-js'> by clicking the black triangle > view the social sharing codes.
At below codes edit the title for the related section:-
<h3>Recommend</h3> <!-- // EDIT RELATED TITLE TEXT -->
At below codes edit the amount of related products to display:-
var maxresults = 5; // EDIT RELATED PRODUCT AMOUNT TO DISPLAYAt below codes edit the click to action text to display:-
var relatedCTA = "View Product >"; // EDIT CLICK TO ACTION TEXT404 Page Not Found Editing
To customise the 404 Page Not Found page headings & texts can be done at below section:-
Payment Methods Icons Editing
Find below codes to edit the payment methods icons available at your shop. Comment/un-comment the line of codes in the example screenshot to display the available payment methods used at your blogger store.
Social Bookmarks & Icons Settings
Customise the URL to your social profile page at below areas:-
Edit at the highlighted code to include your social profile page URLs.
Un-comment/comment out pre-installed social bookmarks if required.

Subscribe via Email
The initial subscribe via email is powered by Google's owned Feed burner. In order to use this plug-in, create a free account with Google Feed burner and follow the easy instructions to activate your email subscribers list. Insert your subscribe via email codes here using Goggle Feed burner credentials..
We have also simplified the codes given by Google feed burner so users can easily include the required Feed burner account name in the codes itself. Below is the example codes:-
<form id='blogrcart-subscribe' action='http://feedburner.google.com/fb/a/mailverify' method='post' onsubmit='window.open("http://feedburner.google.com/fb/a/mailverify?uri=YOUR-FEED-NAME","popupwindow", "scrollbars=yes,width=550,height=520");return true' target='popupwindow'>
<h3>Be the First.</h3>
<p>Always the 1st to grab what's new at our store.</p>
<input name='email' type='email'/>
<input type='submit' name='submit' value='Subscribe' />
<input name='uri' type='hidden' value='YOUR-FEED-NAME' />
<input name='loc' type='hidden' value='en_US' />
</form>
Include your blog feed name registered at Feedburner at the code here " YOUR-FEED-NAME "
Custom Links at Footer Widgets
Below is an example how a footer would display best for your widget. Go to Layout > find footer widgets > click edit and insert below codes as reference:-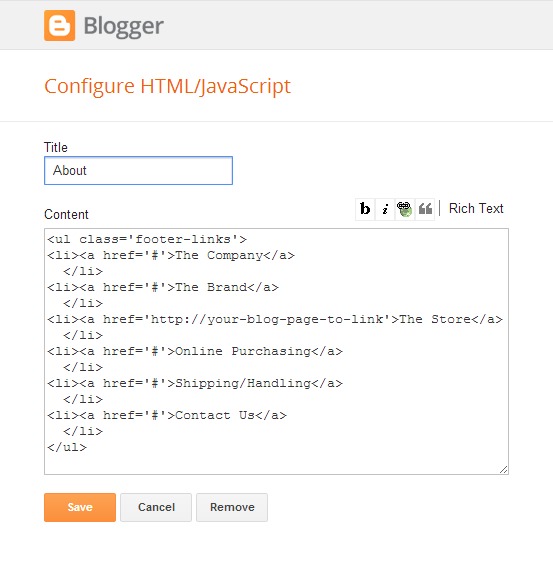
Insert your preferred URL at highlighted codes above.
Example of the footer links would look like so:-
<ul class='footer-links'>
    <li><a href='#'>Terms</a>
  </li>
    <li><a href='#'>Policy</a>
  </li>
   <li><a href='http://your-blog-page-to-link'>Agreement</a>
  </li>
    <li><a href='#'>Conditions</a>
  </li>
    <li><a href='#'>Software</a>
  </li>
    <li><a href='#'>Application</a>
  </li>
</ul>
Insert Header Image using Blogger Widget
You can easily replace the default Header text with an image by using the default Header widget functions. Head over to any page at your Blogger store and at the Header "Pencil" icon, click to open the pop up functions:-
Select an image (preferable 1200pixels X 180pixels at below 100kb in image file size) > choose "Instead as Title and Description" > click Save to upload the Header image.
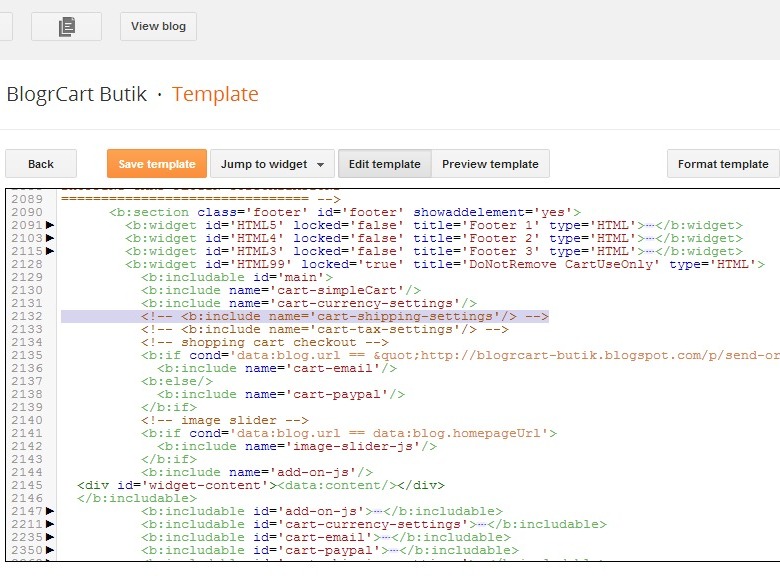
Removing Paypal Checkout Functions
Here's the how to remove the Paypal checkout functions and buttons.Comment out the codes at below screenshot inside <b:includable id='main'>:-

Then find below codes and comment out the Paypal checkout button:-

Click Save Template and View your customisation.
Removing Tax from Shopping Cart
Here's the how to remove the Tax settings functions.Comment out the codes at below screenshot inside <b:includable id='main'>:-

Removing Shipping/Delivery Charges from Shopping Cart
Here's the how to remove the Shipping/Delivery charges functions.Comment out the codes at below screenshot inside <b:includable id='main'>:-
Removing Options (Color or Size or Both)
By default BlogrCart Butik comes with product item options size & colour. The auto post template makes it easier to insert the additional options automatically when publishing a product in your Blogger editor. If the options is not required for a product, here is the how to exclude the item options on your product post.
To exclude automatically via the Auto Post Template > head over to Settings > Post and Comments > at Post Template find these codes:-
For Items options COLOR:-
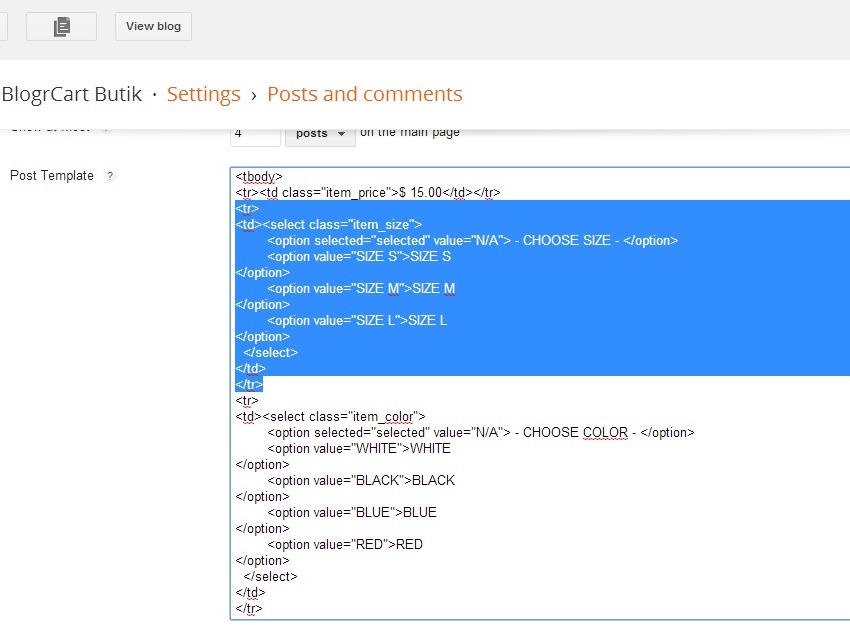
At selected codes above, DELETE the code.
By using the reference above, DELETING the highlighted codes on your published product post will also REMOVE the options COLOR from your product selection.
For Items options SIZE:-

At the selected codes above, DELETE them.
By using the reference above, DELETING the highlighted codes on your published product post will also REMOVE the options SIZE from your product selection.
To REMOVE the options from displaying in your Shopping Cart > go to Template Editor > Widget drop down tab > select HTML99 > then expand the codes below at HTML99 widget:-
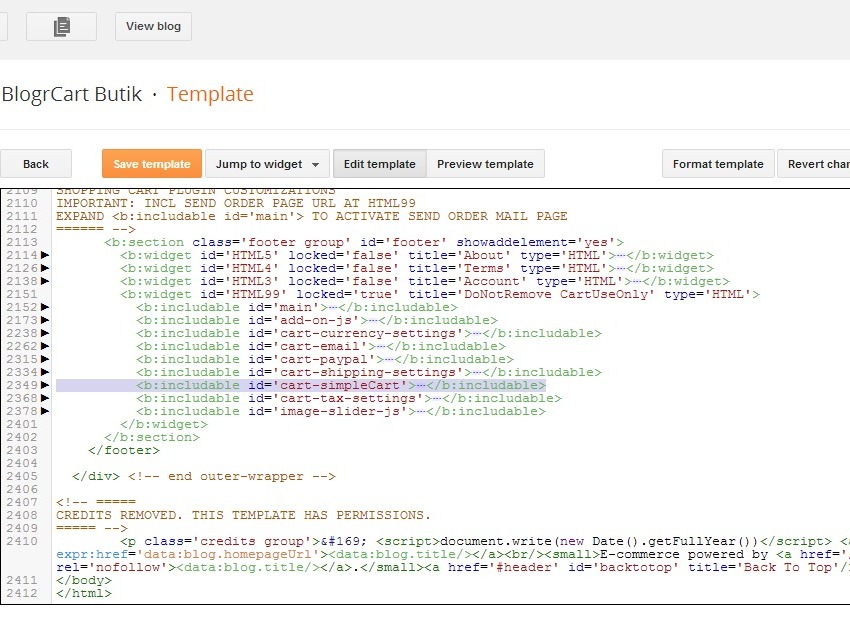
To remove item options COLOR form shopping cart view COMMENT OUT (preferred)/DELETE the codes below:-
// {attr:"size",label:"Size"}, // COMMENT OUT / DELETE THIS LINETo remove item options SIZE form shopping cart view COMMENT OUT (preferred)/DELETE the codes below:-
// {attr:"color",label:"Color"}, // COMMENT OUT / DELETE THIS LINEAdd Product Tagging on Product Images
BlogrCart Butik comes with pre-installed product tagging to display at product gallery pages and also product post pages.These tags are automatically activated by using the TITLE attributes from your product post main image. 3 "keywords" have been pre-installed to display the tagging. They are:-
- Keyword: " new " - Will display the "NEW" tag
- Keyword: " sold " - Will display the SOLD" tag
- Keyword: " offer " - Will display the "OFFER" tag
If you want to display the NEW tag at your product image, in Blogger editor > Select your main product image > select the image Properties link > at the image TITLE input field > type the keyword " new " (without quotes)
If you want to display the SOLD tag at your product image, in Blogger editor > Select your main product image > select the image Properties link > at the image TITLE input field > type the keyword " sold " (without quotes)
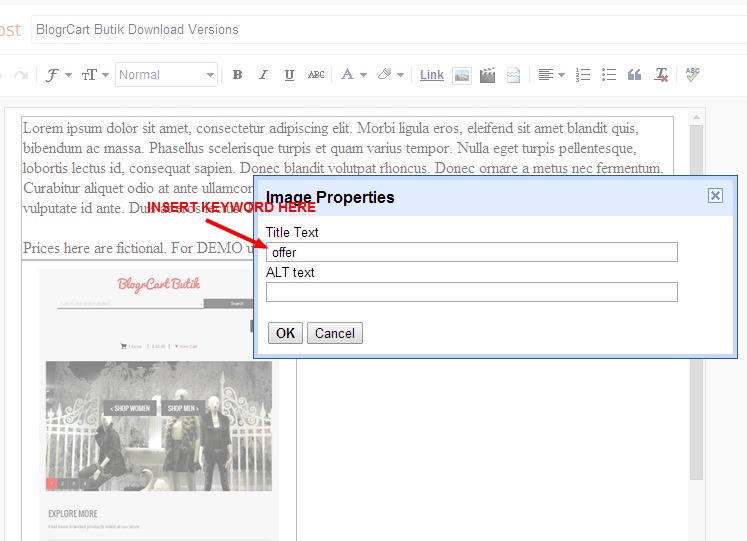
If you want to display the OFFER tag at your product image, in Blogger editor > Select your main product image > select the image Properties link > at the image TITLE input field > type the keyword " offer " (without quotes)
Edit Payment Icons on Product Posts
You can display up to 16 payment icons at product pages by editing at below codes. In Template Editor > Widget Tab > Select Blog1.Expand <b:inlcudable id='post'> and find below codes:-
<span class='center'><b>WE ACCEPT</b></span>
  <ul class='payments'>
     <li class='mastercard'/>
     <li class='visa'/>
     <!-- <li class='electron' /> -->
     <li class='americanexpress'/>
     <li class='paypal'/>
     <!-- <li class='twocheckout' /> -->
     <!-- <li class='sage' /> -->
     <!-- <li class='ebay' /> -->
     <!-- <li class='moneybookers' /> -->
     <!-- <li class='solo' /> -->
     <!--li class='directdebit'/-->
     <li class='maestro'/>
     <li class='cirrus'/>
     <li class='discover'/>
     <!--li class='westernunion'/-->
     <!-- <li class='delta' /> -->
   </ul>
Uncomment/comment out the codes to display the payment icon image of choice. Here's an example of the "Electron" payment image to be display:-
<li class='electron' />
Here's an example to remove a "Cirrus" payment icon image:-
<!-- <li class='cirrus'/> -->